Monday, October 11, 2010

Stability through Pico De Gallo

"Retirement" has been treating me well. No complaints from lack of sleep or stress from too much work. In fact, I think I may be the first to stress out from the lack of stress in my life. Is that possible? The thoughts of no responsibility, no corporate strain nor protocol and no 6 AM wake up calls to get my butt to work used to make me smile. Now, the thought of stability and financial independence sound way too good right now. Although financial independence is something that doesn't happen over night, stability can definitely be found in the little things... i.e. homemade pico de gallo...


This recipe is from a cooking class at Let's Get Cooking in Westlake, CA. It's fool proof. It's the recipe for pico de gallo that will never let you down... consistent and stable. Because I live in California I was able to gather most of the ingredients from the Farmer's Market this past Saturday - tomatoes were still ripe!

Pico De Gallo
1/2 medium onion, finely chopped
4 large plum tomatoes, seeded, chopped
2 serrano chiles stemmed, seeded, minced
1/4 cup cilantro, chopped
1 lime - juiced
2 tbsp olive oil
Salt to taste

Combine the salsa ingredients in a medium bowl, mix, taste and adjust seasoning and serve. Que Facil!

Tuesday, August 3, 2010

Practicing Patience


Let's take a step away from summer squash ideas and enter the realm of patience. Ahhh, something I've learned is absolutely necessary in the midst of a career change. Since June, I've been waiting. Waiting for some test dates to arrive, waiting for my unemployment appeal (ugh don't ask), and then waiting some more for application deadlines. Let's be honest though, I have nothing to complain about. I've decided to take this free time and put it to work.

This weekend I managed to make it down South and visited some great friends in Santa Monica. Saturday morning we found ourselves in line at Huckleberry, a brunch spot just off Wilshire. With a beautiful morning to just sit around and chat, I found myself biting into homemade shortbread. Definitely not part of my diet plan, but I was most definitely inspired!

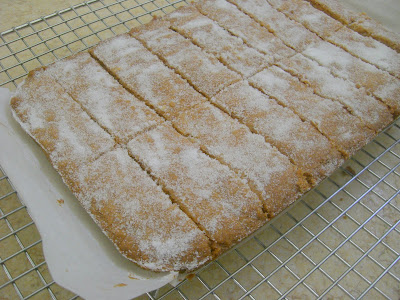
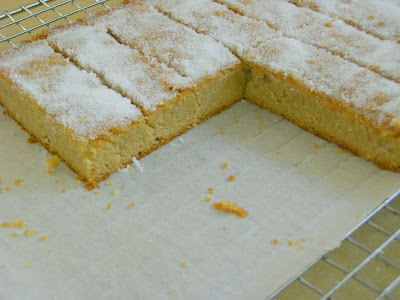
Here's my rendition of shortbread infused with some local Toyon honey (very dark, rich honey). Shortbread has very few ingredients, but there are some important steps that seem to take up the day - which was just what I needed - to kill some time.

Shortbread infused with local honey
adapted from Martha Stewart's Baking Handbook
3 sticks (1 1/2 cups) unsalted butter at room temperature, plus more for pan
2 1/2 cups all-purpose flour
1/4 teaspoon salt
1/4 cup dark, rich honey variety
1/2 cup plus 2 tablespoons confectioner's sugar
Confectioner's sugar for sprinkling the top of the shortbread

Preheat the oven to 325 F. Butter a 12-by-8-inch rimmed baking sheet and line with parchment paper, leaving a 1-inch overhang on long sides. Whisk together flour and salt in a small bowl; set aside.

In the bowl of an electric mixer fitted with the paddle attachment, beat butter until fluffy on medium speed, 3 to 4 minutes. Add confectioner’s sugar and honey; continue to beat until very light and fluffy, about 2 minutes, scraping down the sides of the bowl as needed. Add flour mixture, and beat on low speed, scraping down sides occasionally, until just incorporated. (It should have the consistency of soft cookie dough)

Using a small offset spatula, evenly spread dough in prepared baking sheet. Chill in the freezer or refrigerator until dough is firm, about 15 minutes.

Prick dough all over with a fork. Bake, rotating sheet halfway through, until shortbread is golden brown, 40 to 45 minutes. Transfer to a wire rack and immediately sprinkle with confectioner’s sugar. The more sugar on top, the better! While still hot, use a large knife to cut shortbread into 4-by-1-inch pieces. Cool completely in the pan. Shortbread can be kept in an airtight container at room temperature for up to 1 week.

Wednesday, July 28, 2010

Summer Squash Ideas

Phew, so much time on my hands that I'm forgetting about my to do list! Funny how that happens. If that to do list gets away from me the day becomes a black hole. First item on the list - find a job... check! Second item on the list - cook up that summer squash that is growing like crazy in the backyard... check! Third item - blog it... well that has taken a bit too long, so here are some fun ideas if you like to eat summer squash.

The first item I threw together is a quick pan fry of baby squash, ghee and mint. Yes, mint. It was pretty delicious! If you are a beginner in the kitchen, ghee and mint are great starts! They taste so wonderful on their own that you should have confidence that they will taste just as delicious together when paired with some summer squash.

No mint on hand? Try dill. No dill? Try basil... get the picture? Herbs are a cook's best friend (that and butter). Don't be shy!

Baby Squash Saute - Working Girl's Version
1 lb baby summer squash sliced about a 1/4 '' thick
3 tbsp Ghee
2 tbsp diced mint leaves
(crumbled goat cheese is the secret ingredient)

Begin to melt the ghee on medium heat. Toss in the summer squash and let it sizzle for about 5 minutes. Stir in the mint with the stove still at medium heat. I like to caramelize my squash a little so tend to keep it on the pan a little longer. Once cooked through, add to a bowl and sprinkle some crumbled goat cheese on top for fun.


Next installment of summer squash coming soon! Egg white and squash frittata ... for my healthy friends.

Thursday, July 1, 2010

Life of Leisure

Yes, I am living the life of leisure. However, I'm not so sure if this is how life should be at 26 years old... but I'll take it for now. The best part of unemployment is having time to realize what it is I truly want to do as a career. The bad part of unemployment is that my blog title no longer makes sense: nope, not a working girl - nope, not in the corporate world. Although I have to admit it feels really good to read that previous sentence.

The world is my oyster! I can now move forward towards my personal legend! I have seen the light! And I will be taking this amazing avocado salad dressing with me to top all the bland cooked chicken and boring vegetable salads that cross my path!

Smooooth Avocado Dressing
adapted from Choosing Raw
1 avocado
1 garlic clove
4 tbsp olive oil
1 lime (juice & zest)
salt to taste
pepper
1/4 tsp dijon mustard
1 tbsp cumin
* I'd add a cup of cilantro if you have it on hand
1/4 cup - 1/2 cup water

Combine all ingredients, except the water, in a food processor until smooth. Slowly add the water until you get the consistency you are looking for. The sauce is great on salads, chicken, pork tenderloin, grilled eggplant, the list goes on.

Sunday, June 20, 2010

Summer Watermelon Salad

It's definitely summer in Southern California. I've been spending my new found freedom (ehem unemployment) catching up on books I haven't had time to read, spending time with friends and family, working on applications to grad school, planning a trip to Latin America, and, of course, cooking up a storm. Life couldn't get any better - that is, until I discovered this amazing watermelon salad.

Personally, I'm not fond of the watermelon salads that add cheeses or meats; I find them very off putting and normally avoid them at all costs. This watermelon salad, however, is very different. It's dairy free (like watermelon salads should be) and tastes like a daiquiri from your favorite tropical location. Convinced? I am!

Summer Watermelon Salad
about 4 cups cubed watermelon
1 lime (for juice & zest)
2 tablespoons chopped mint
1 tablespoon chopped basil

In a large bowl combine watermelon and the juice & zest of one lime. Toss in the mint and basil. Let the flavors marinate for about 15 minutes. Serve with your favorite BBQ or keep in the fridge for dessert after BBQ. You could even use the juices from the salad to create a delicious summer martini.

Friday, April 9, 2010

Almond Butter Banana Blondies

Decadent and healthy? It's possible with these Almond Butter Banana Blondies. They're dairy free, sugar free, gluten free and yet they still taste pretty amazing. I think I ate about half the pan over the course of a week... a little bit at work with my coffee, a little bit after dinner, a little bit for breakfast... ridiculously delicious and satisfying.


This is what I like to call a "one bowl" recipe. "One bowl" recipes use one bowl to mix all of the ingredients . . . they're great if you don't have too many tools in the kitchen or if you are just too busy to bake.

Almond Butter Banana Blondies
adapted from Elana's Pantry

1 (16 oz) jar of roasted Almond Butter
1.5 ripe bananas
1 cup maple syrup
2 eggs
1/2 teaspoon sea salt
1 teaspoon baking soda
1 scoop Chia Seeds (optional... you could add flax seeds too)
1 cup dark chocolate chips (optional)

Pre heat the oven to 325 degrees. Dump the almond butter into a large mixing bowl, add the banana and stir until banana is incorporated. Add the maple syrup then the eggs. Once all of these ingredients are well combined, add the sea salt & baking soda, mix well. Lastly add the chia seeds and chocolate chips (reserve about 3 tablespoons of chocolate chips).

Pour the batter into a well greased 9 x 13 pyrex baking dish. Scatter the remaining chocolate chips over the top of the batter to make it look pretty! Bake for around 35 minutes. I had to bake mine for longer . . . I've accepted the fact that every oven is different.

Remove from oven and let cool. You can store these awesome Almond Butter Banana Blondies in the fridge. Next batch I may even try freezing.

Enjoy!

Tuesday, March 16, 2010

Quick Cooking with Quinoa

It's amazing how fast the natural foods industry moves to get popular items on the shelf for the masses. There's the soy milk craze, acai craze, and now I'm starting to get the sense of a quinoa craze. It's everywhere! Its even showing up at local restaurants as side dishes, who would have thought? Check out this recent article Link


So, I've been cooking with quinoa for a couple years now. At first it tasted funny, there was no satisfaction from eating it, and I always ate it plain. . . a huge mistake! After lots of experimenting in the kitchen, I now love how versatile the seed is - I eat mine for breakfast with almond milk, coconut flakes and a banana, for lunch in my salad or for dinner with some veggies & protein! The best part is, it only takes about 20 minutes to cook. The second best part is, you can really make quinoa suit your personal tastes.

For savory, I'm posting one of my favorites. . .

Quinoa with Leeks & Asparagus
3 leeks chopped up (about 1 1/2 cups)
1 bunch of asparagus (I pick the skinny stalks)
Pepper
Pinch of Salt
Maybe a tablespoon or two of white wine
2 cups cooked quinoa
Olive oil

Cooking the quinoa
The proportions are simple: 1 cup quinoa to 2 cups water. Place everything into a sauce pan, turn the burner on high and bring the water to a boil. Once boiling, turn down to simmer, cover and let it sit until water is fully absorbed. This may take around 20 minutes... not that long.

The good stuff
Dice leeks into small slices. Be sure to clean them really well before chopping. Wash and dice asparagus. In a large sauce pan, add some olive oil over medium heat and stir in the leaks. Once leeks become transparent, add the asparagus. Add salt & pepper to taste... I even threw in a couple tablespoons of white wine (psst secret ingredient). Let everything marinate. The asparagus will turn a vibrant green and the leeks will start caramelizing. After about 8-10 minutes, add 2 cups of cook quinoa. Toss around to soak up the flavors. You could even let the quinoa crisp up a bit on the bottom of the pan.

This makes about 4 ample servings. I topped mine off with a fried egg and some avocado.

Saturday, February 27, 2010

Breakfast for Athletes

I love pancakes but I don't love the heavy, slouchy, lazy feeling I have after I gorge myself with buttermilk pancakes, french toast or waffles. As a result, I rarely eat such high density, carb overloading options for breakfast, especially during the week days.

This new recipe is anything but unhealthy, yet it also satisfies the pancake cravings. Using coconut flour (you can find this at your local Whole Foods), whipped-up egg whites and a ripe banana, you are able to achieve a "pancake" like breakfast that leaves you feeling satisfied and ready to take on the day. I promise.


Just check out this recipe below...

Banana Pancakes... a lighter version

2 large bananas, smashed
2 eggs
2 egg whites
2 tbsps high quality honey
2 tsps vanilla
1 tsp baking soda
1/4 cup coconut flour (or Almond Meal)
Olive oil or butter for the frying pan

Directions
Combine smashed bananas, eggs, honey, vanilla and baking soda with a whisk or fork. Add the coconut flour and combine well. In a separate bowl, beat the egg whites until soft peaks form. Fold the whipped egg whites into the pancake mixture.

I like to top mine off with some blueberries while they are cooking in the frying pan. You could also add some coconut flakes, strawberries, walnuts, you get the idea.

In a frying pan, heat 1 tbsp butter or olive oil. Lastly, fry up your "pancakes"!


Recipe courtesy of a new Paleo/Gluten/Fitness friendly blog, SweetCheeksHQ.com

Tuesday, February 23, 2010

Teach Every Child About Food

For my fellow food bloggers to pass along. Food education is just the beginning of a total transformation of the American Lifestyle. Change starts with you.

Saturday, February 20, 2010

Blogging Scones

So I'm not too sure how long my break from blogging really was, but I hope that this new recipe will help me redeem myself in the food blogger universe.

It has been a fantastic 2010. The year started off with a fabulous trip to Cabo San Lucas... sun, chips, guacamole, beer, chips, guacamole... a working girl could get used to the vacation life. Unfortunately, reality hit with a small cold and piles of work with no end in sight. Fortunately, inspiration arrived in the form of a Culinary Institute of America Breakfasts & Brunches Cookbook which finally provided me with a ham and cheese scone recipe that I plan to stick with all year long.

Although a tad on the sweet side, these ham & cheese scones are perfect for a Sunday brunch. They come out of the oven very moist with tons of flavor from the ham, cheese and scallions. If you aren't a fan of the sweet and savory, you could easily replace the ham & cheese with some fruit of choice - that's why I love this recipe. It's versatile and simple, allowing the chef in the kitchen to take the reins.

Ham & Cheese Scones
The Culinary Institute of America: Breakfasts & Brunches

3 cups all-purpose flour
1/2 cup sugar
2 tbsp baking powder
1/2 tsp salt
1 cup medium-diced ham
1/2 cup medium-diced cheddar cheese
1/2 cup sliced scallions
2 cups heavy cream.

Preparation
Cut two 10-inch circles of parchment paper. Use one to line a 10-inch round cake pan and reserve the other piece

Scones
Sift the flour, sugar, baking powder and salt together in a mixing bowl. Add the ham, cheese, and scallions and toss together with the dry ingredients until evenly distributed. Make a well in the center of the flour mixture. Add the cream to the mixture and stir by hand jut until the batter is evenly moistened. Place the dough in the lined cake pan and press into an even layer. Cover the dough with the second parchment paper circle. Freeze the dough until very firm, at least 2 hours.

Preheat the oven to 350F. Prepare a baking sheet by spraying it lightly with cooking spray or lining it with parchment paper. Thaw the dough for 5 minutes at room temperature; turn it out of the cake pan onto a cutting board. Cut the dough into equal pieces and place the individual pieces on the baking sheet about 2 inches apart.

Bake the scones until golden brown, 30-40 minutes. Cool the scones on the baking sheet for a few minutes, then transfer to cooling racks. Serve scones warm or at room temperature. They are awesome the same day they are made but of course, you may freeze them for up to 4 weeks.